|
|---|
| Home | Gallery | Tutorials | Equipment | About |
|---|
How to Improve Light Pollution in your images
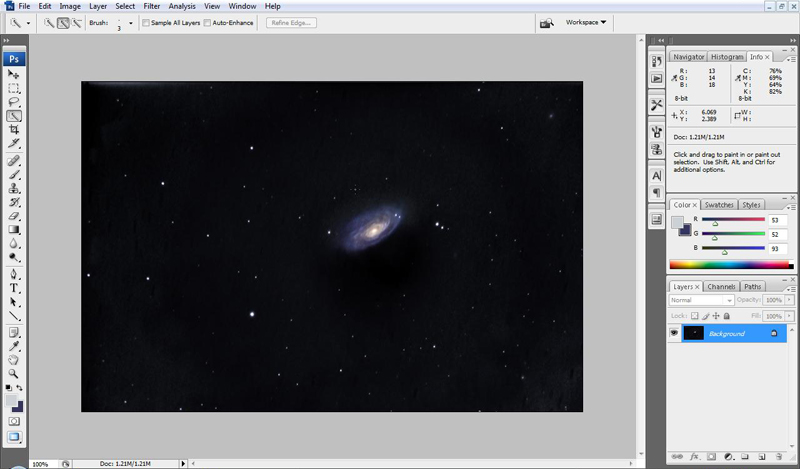
With your image open in Photoshop, click the 'info' tab in the upper right hand corner. The first thing I usually do is check the color balance of the background. I do this by running my 'wand' around various parts of the image, most particularly in this image, close to the galaxy. If you note in the info pallet at upper right, currently R=13, G=14, B=18, meaning it needs more a little more red and a little more blue.
To correct this, open up the 'color balance' window by clicking on 'image'>'adjustments'>'color balance.' Since the background lies in the shadows part of the image, check the shadows box in the color balance window and make the necessary adjusments. You can tell when your image background is balanced for example in this image by adding +5 to Red and +4 to Green, which makes the background balanced evenly at 13. These numbers only refer to this particlur image, every image is different, but this same method applies to any image. Images with lots of nebulosity are a lot more difficult.
Now we are ready to move on to getting rid of the LP.
Next click on 'layer'>'adjustment layer'>'curves.' In this image, as I was reading the background with the 'wand,' in the area next to the galaxy, it was about 18. So in the curves adjustment window I set a point at 18 Output and 18 Input. Then I set points at about 25, 30, 35, etc. as displayed in the above image. Now you will need two more points, these will be the ones that make the difference in the image. I set one at about 9, and the other is the Zero point. Next I raise the Output of the Zero point to 17, then raise the point I set at 9 also to 17. By clicking the preview box on and off, you can check wether or not you're not raising the 'Output' so much that it starts removing too much info in the image. Again these exact numbers only apply to this particular image, but you get the idea. When you're satisfied with your own image, click 'Ok' and proceed with any more processing you need to do. This method also works well for vignetting in images.
|
| Home | Gallery | Tutorials | Equipment | About |
|---|
| Copyright 2010 All Rights Reserved |
|---|