|
|---|
| Home | Gallery | Tutorials | Equipment | About |
|---|
Registax Version 6
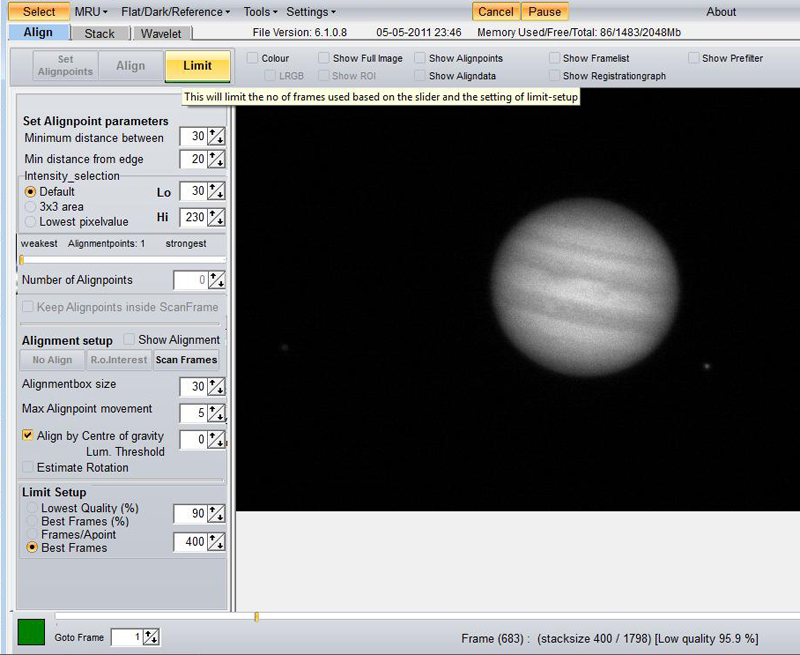
For the purposes of this tutorial I will be using Jupiter as the subject. First click the 'select' tab at the top upper left and choose an AVI file you are ready to process. With the image open one needs to set some of the parameters before aligning the frames. For planets I have found that using 'Align by Using Centre of Gravity' function works very well. For Saturn, one can use this, or the multi-point alignment. For Lunar landscape images, multi-point alignment is the only way to go. Now let's click the "Align by Using Centre of Gravity' checkbox. You will see a red circle appear where Registax has determined 'center' is. Next, move your cursor over the 'red circle' and click it. That set the point for the center of gravity alignment.
The next thing one needs to do before clicking the 'Align' tab, is determine the method on how you would like the frames limited to gain the best result. For planetary, if I have some decent 'seeing' and the data is good, I can get good results using only best 400 frames. So in this example, I went over to the bottom left to 'Limit Setup' and clicked the 'Best Frames' circle. I then set the frame count to 400. This means Registax will only save the best 400 frames for the stacking process. I am now ready to click the 'Alignment' tab at top left. NOTE: For lunar landscape images I recommend using the 'Set Alignpoints' tab, then using the slider to reduce the amount of points or manually enter the amount, (Registax seems to want to place too many points for my
When Registax finishes aligning the frames, your best frame will be displayed and you can note down at the bottom of the window your 'Low quality %'the total amount of frames, the stacksize and the frame number of your best frame. Next click 'Limit.' You are promptly taken to the 'Stack' page.
Note the 'Stacking Options' area at upper left, and make sure 'StackSize' is set to default, 'Normalization of frame intensity' and 'Correct geometry' are checked. Next click the 'Stack' tab at upper left. When Registax finishes the stacking process, click the 'Wavelet' tab at upper left which will open the wavelet page.
Here is where you bring out the detail in your image by using the wavelet sliders. The sliders are numbered 1-6, I refer to think of them as fine to corse sharpening, with 1 being fine, (a small pixel radius) and 6 being corse, (a large pixel radius.) I also recommend giving this link a read as you can trap some of the noise that is created from sharpening, by using settings in the 'denoise' box. http://www.astronomie.be/registax/denoiseandsharpen.html
Here I have sufficently sharpened and denoised the image using the wavelet sliders and some denoise settings, and I thought it looked a little dark, so I opened up the 'Gamma' window by clicking on the 'Gamma' tab at upper right, and bumped it up to 1.10 from 1.00, which was plenty. NOTE: You can save your wavelet 'schemes' for recall another time. I have 14 different levels of wavelets saved, and usually one of those will do the job nicely. Just click 'Save Scheme' and give it a title. You can access it by using the 'Load Scheme' tab, or checking 'Available schemes,' at bottom left. When you are finished making adjustments, click the 'Do all' tab at upper left, then save your image. If you want you can save several different versions of your image just by resetting the sliders and repeating the process, without having to go back and start from the very beginning.
|
| Home | Gallery | Tutorials | Equipment | About |
|---|
| Copyright 2010 All Rights Reserved |
|---|