|
|---|
| Home | Gallery | Tutorials | Equipment | About |
|---|
|
One Star Declination Drift Method For Digital DSLR/CCD Photography Oriented for the Northern Hemisphere
For the beginning astro-photographer, there are several obstacles to overcome. For myself, the main obstacle being learning how to align my mount using the declination drift method. It was and can be, very confusing trying to figure out exactly what north, south, east, west, right, left, up and down actually refer to in relationship to the view one see’s through the eyepiece and the orientation of the mount when first starting out. One of the main questions I kept asking myself was, “why do I keep having to slew back and forth between two stars, when I’m only going to be guiding on one?”
After I finally understood, I thought “there has got to be an easier way to do this and explain it in such a manner that one easily understands, without going into too much depth, yet enough depth that one can achieve their goal.” So without further adieu, let’s get started…

There are a couple of things you need for this tutorial. One is an illuminated reticle eyepiece. These are readily available from several suppliers on the net, I recommend either a 6mm eyepiece, or a 12mm eyepiece in conjunction with a 2x barlow lens. This will make the star move off the crosshair of the reticle much quicker than by just using a 12mm alone, thus speeding up the alignment process.

Another thing you will need, is a small leveling device for getting your mount perfectly level. I recommend one such as a small spirit level, pocket level, or string level. Personally I use two very small spirit levels that are only a couple of inches(5cm)long. I found these at the local hardware store.
Now the fun part… A few points I need to mention. For the purposes of this tutorial, when you are NOT looking through the eyepiece, we will refer to the cardinal points in their natural “N, S, E, W,” state. This will refer to the direction the mount will be adjusted, as you align your mount. Assuming you have your scope set up, your mount PERFECTLY leveled, go ahead and do a "go-to" star alignment using whatever method you would use before a viewing session. Follow up by doing a rough polar alignment. This will get you very close to aligned. Next you are ready to slew the scope around and find a star to align your mount on. Pick a faint star, fairly high up due south near the celestial equator and about an hour before the east/west meridian line. After you have located a star and have it in your field of view, orient your illuminated reticle eyepiece so that as you move the star east and west(or right and left)by using the hand control, the star will move parallel with one of the grid lines therein. Next, center the star in your eyepiece… You are going to observe the star and make manual adjustments to your mount until the star stays on the crosshair of the illuminated reticle eyepiece for no less than five minutes, (I myself make adjustments my mount until it stays there about 10 minutes.) First starting out, I suggest making small adjustments until you learn just how much adjustment, affects the movement of the star away from the center of the eyepiece. This way you won’t over correct, BUT your first initial adjustments will be the largest, (unless you're lucky and you set your mount up almost spot on.) Also, the adjustments you make in the altitude (UP/DOWN) axis, will be much less(very small adjustments) than those that you make in the EAST/WEST axis.
Remember the front of the mount is always the side facing north, the back is the side facing south. You will be facing south when you are drift aligning your mount, so, the left side is east, the right side is west.
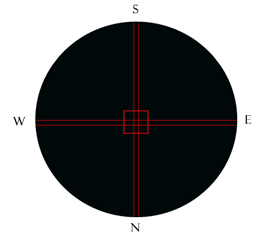
(figure A.) When looking through the eyepiece, without the use of a diagonal, the orientation will be as in “figure A.” This is the orientation you will see looking straight through a refractor, or a SCT, pointed in the direction of the star you will be using to align your mount. As you notice, the view is upside-down and reversed.
Now… HOW TO MAKE ADJUSTMENTS TO YOUR MOUNT
Looking through the eyepiece;
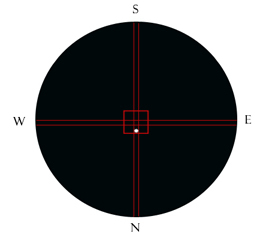
(figure B.) If the star drifts UP/SOUTH (See figure B.) Manually adjust the mount (not the scope) to the WEST/LEFT. When you do this you will notice the star moves LEFT in the eyepiece. Then, using your hand control, re-center the star.
(figure C.)
If the star drifts DOWN/NORTH (See figure C.) Manually adjust the mount (not the scope) to the EAST/RIGHT. When you do this you will notice the star moves RIGHT in the eyepiece. Then, using your hand control, re-center the star.
(figure D.)
If the star drifts RIGHT/EAST (See figure D.) Manually adjust the mount (not the scope) UP, or raise it in altitude. When you do this you will notice the star moves DOWN in the eyepiece. (Remember to keep adjustments very small.) Then, using your hand control, re-center the star.
(figure E.)
If the star drifts LEFT/WEST (See figure E.) Manually adjust the mount (not the scope) DOWN, or lower it in altitude. You will notice the star moves UP in the eyepiece. (Remember to keep adjustments very small.) Then using your hand control, re-center the star. Keep monitoring the movement of the star as it will gradually take longer and longer for it to move away from the center of the eyepiece. Keep doing this process of adjusting the mount and re-centering the star until it stays centered for at least 5 minutes or longer if needed. You are now precisely drift aligned! (Click here for the southern hemisphere orientation.)
ENJOY ASTRO-PHOTOGRAPHY!
|
|---|
Copyright 2010 All Rights Reserved