Home Gallery Tutorials Equipment About


How to use a high-pass filter mask for
astrophotography in Photoshop CS3


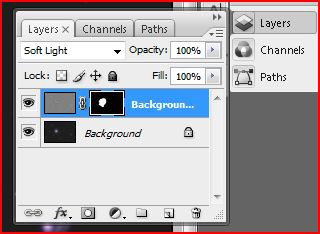
Using a high pass filter layer mask:

Here is a nifty little technique I picked up from an article in Astronomy magazine. The credit for this processing trick goes to the author of the article, Tony Hallas.

This technique created an improvement in several of my images. So, in my own words I will see if I can explain the process plus, another little nifty trick that I figured out on my own.

So, without further adieu...

After you've processed your image and gotten as much data out of it as possible, click on "layer," "duplicate layer."

At this point, just go ahead and leave the layers pallet box open so you can see what's going on.


Your duplicate layers should be high-lighted, so now click on "filter" > "other" > "high pass."


There is no fixed setting for this filter, as it works well with different settings on different objects. So to start off just to get a feel for it try setting the radius to around 20 and click ok'.

The image should have just turned kind of funky looking. Now in the layers pallet box, change the blending mode from "normal," to "soft light."

To get an idea of what the filter is doing you can turn the layer on and off at any time using the little eyeball icon in the layers box to see what the high pass filter is doing to the image.

If the filter is giving unsatisfactory results, you can always just open the history box, trash that step and try again using a different high pass filter setting.

To make this even better...

Once you do get some results you are satisfied with, you can add another step called a "Layer Mask." To do this, in the header, click on "Layer," > "Layer mask," > "hide all." There should be a black box appear in the duplicate layer box. You just "hid" that layer making only the background layer visible.


Now set the foreground color to white, then choose the brush tool. Choose a soft brush, (this creates a blending effect) and choose a brush size accordingly so that when you paint over the image it will reveal only the parts of the layer that you want to be revealed in the "masked" layer. (now try clicking the layer on and off to see the result.)


You can also set the opacity of the brush so that it takes multiple strokes to totally reveal the parts of the hidden layer that you like, or you can leave the opacity at 100%, and adjust the opacity of the final result in the layers pallet box before merging the layers.

As you are painting over the duplicate layer you reveal the high pass filtered layer.

A nifty little trick...

Should you paint over portions of the image and they seem to become "overdone," such as the brighter parts of the image gettin blown out, or some of the stars becoming a little bloated, you can change the foreground color to black, select the size of your brush and paint over those portions re-hiding the duplicate layer.

When finished, just "flatten" the layers.

Home Gallery Tutorials Equipment About


Copyright 2010  All Rights Reserved